Learn more about screen tone etching with these links!
Start at the beginning: Screen Tone Etching Techniques
Harakezuri Screen Tone Etching with Clip Studio Tools
| Hara Kezuri (Patch Etching) |  |
Hara Kezuri is the Japanese name for a specific type of screen tone etching. It’s known in English as “Patch Etching” but when you type “harakezuri” into Google's Japanese to English you get “unraveling”.
With Japanese words there are always going to be translation considerations. My own take is that it’s called “patch” etching because you are scraping away “patches” of tone with your knife, creating bare patches on the tone. Or, I should say, you’re scraping away patches of tone with your clip studio tool designed for that purpose.
In the instructions on this page, I’m using Clip Studio EX Version 1.9.3. Your version may differ, but it should be okay if you don't have 1.9.3 (I hope).
Here’s how to make a Clip Studio Hara Kezuri tool:
I’m going to go fast here, and presume that you’re familiar with how to modify tools in Clip Studio:
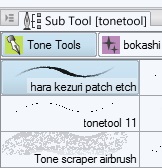
- Go to the original set of pens that come with Clip Studio and then make a duplicate of the “G-pen” sub-tool.
- Move it to a new space on the tool ribbon and create a new tool. Call this tool “Tone Tools” or something like that. This will be where you’ll keep your awesome tone etching tools.
- Change the name of the G-pen sub tool to something like “Hara Kezuri Tool” or “Patch Etching”. Also, set the opacity of the tool to 90%. Since we’re mimicking analog (e.g. not digital) techniques, it’s more convincing to have a little bit of fade on the edges of the tool.
That’s it! Since all we’re doing is creating a basic tool that scrapes away large patches of tone, the g-pen will work without modifications. As always, don’t just take my word for it, but experiment and have fun!
HOW TO ETCH TONE WITH CLIP STUDIO – USE THE ALPHA LAYER
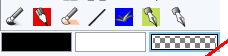
See, what you’re doing is you’re not erasing the tone. No, instead you’re using a tool and making the tone transparent. You see those three rectangles at the bottom of your tool set? These three tools tell you the colors you’re currently working with. The third rectangle with the sort of gray checkerboard, that’s the “Alpha” level. “Alpha” means “transparency”. Select this checkerboard whenever you are etching tone.
 When you etch, you will be making your edits on the tone layer itself. When you are etching tone, you are effectively painting transparency onto the screentone. The screentone layer isn’t like a raster layer, instead it's a bunch of computer-generated binary dots. The computer is calculating the location and density of all those little dots as you’re editing your clip studio project. So remember, click the checkerboard to edit tone.
Because there’ll be times when you’re using the tone etching tool and you have the tone layer selected, and you’re trying to etch the tone and nothing is happening. And you’ll be like, duuh, why is nothing happening? The answer is it's because you probably have the black or white foreground color rectangles selected, and not the alpha rectangle. If you have black selected, for example, then your tool will just be painting a black color on top of the tone. But the tone is already black, so it’ll look like there’s nothing happening. Instead, go and click on the alpha rectangle and try it again. Walla! It works!
What is Harakezuri tone etching used for?
Okay so now you have the tool. What is it used for? Among other things, the friction brush can be used to etch computer screentone to create illusions of:
- Clouds
- Steam
- Sunlight through trees
- Hair highlights
Stuff to remember about tone etching
That’s an important point: as an artist, you are trying to create an illusion of a 3 dimensional world on a 2 dimensional plane. You’re not trying to create an exact reproduction of the world, because we have cameras for that and they work a lot faster. Instead your job is to create a world on the page that looks sort of like the one we live in, but also where your readers don’t have to frown and scratch their heads trying to figure out what you’ve drawn.
As we go through examples, it’s also important to remember that none of the etching strokes we discuss in this site are meant to be used by themselves. In other words, you will probably never use one etching technique in isolation from other etching strokes. A good composition will include several different etching stroke techniques.
Lazy Examples of Harakezuri Tone Etching
So anyway, here is an extremely lazy demonstration of patch etching. I used the gradient tone for the background, and I used the Hara Kezuri tool to make quick cloud-like structures:

So that’s clouds for you. I’ll point out here that the clouds look “natural”. How? I think they look more natural because I drew these clouds with lines running parallel to the horizon.
There’s a whole bunch of tricks to effective rendering of clouds with tone, but I’m not going to go into that here. Also, there’s a whole other deal about getting the dots you’ve created to render on a computer screen. Not going to go into that either. Maybe elsewhere I’ll discuss this subject, but on this page it’s out of scope.
Harakezuri Etching Video
Finally, I found this video here. There’s no sound (except the sound of blade scraping the tone), but it demonstrates how to create clouds with harakezuri etching. Look closely: not only does he use the “patch” etch with the belly of the knife to create white patches, but he effortlessly switches to the point of the knife to create fade illusions as well. There’s a lesson here. I thought about maybe using the “tilting” effect of my Wacom pad to do this, but there’s a pretty steep learning curve. Or maybe you can mess with the opacity of the brush? I don’t know.
Thanks for reading!